-
I forgot my password. How do I recover it?
Student passwords cannot be recovered or reset online. Please ask your teacher for your password.
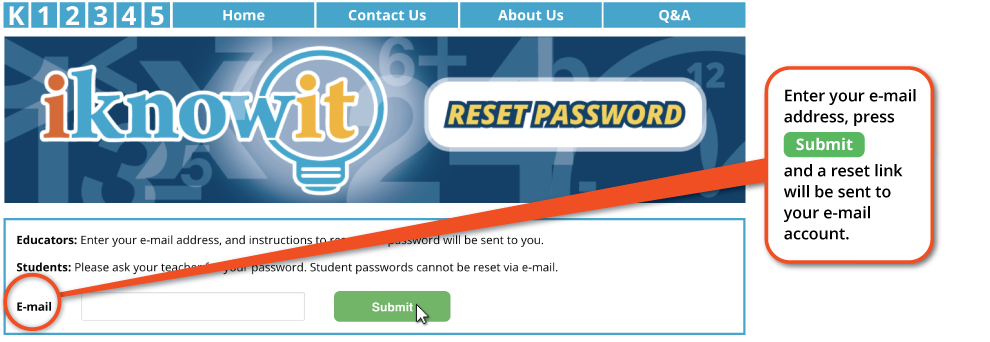
Teachers, and Administrators: You can reset your password on our password reset page. You will enter your e-mail, and a password reset link will be sent to you.
-
I am having trouble with the password reset. Now what?
If you're having trouble with our password reset feature, please check your spam folder. Sometimes our e-mails are accidentally filed as spam. (Please check the "not spam" button on your email client to whitelist us.)
If you're still having difficulty, please send us an e-mail and we'll be happy to help.
-
I am a student and I can not log in. I know that my password is correct.
Students will need to ask their teacher for their username, password, and class code.
We can not reset student passwords because we do not store student e-mails. Teachers should be able to enter, view, and edit their class' usernames, passwords, and the class code.
-
What is a class code?
When teachers set up their account, they are required to choose a class code. Your class code can be any unique word consisting of letters and numbers.
Students will need to enter their username, password, and class code to log in. Be sure you share the class code with your students.
Tip:When you choose your class code, pick something that will be easy for your students to type. Also, do not choose words that you use in your password. (For example, "apple" or "room124" would be great class code choices.)We have a class code feature to avoid issues with duplicate student usernames. Without the class code feature, it can be difficult to find 20 or 30 unique usernames. Because of this feature, student usernames that overlap between schools and districts are not a problem.
Students: Your teacher can look up your username, password, and class code.

-
I am a teacher. How do I set up a class roster?
Step 1: Log in with your e-mail and password.
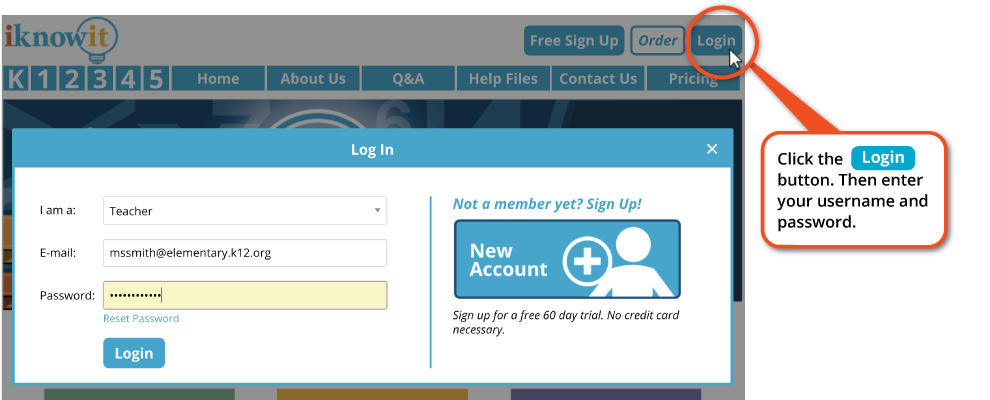
Step 2: Click on "My Students" at the top of the page.

Step 3: Create a name for your class. (examples: "Third Period" or "Mr. Smith's Class")

Step 4: Select the "Add Students" button then add names, usernames, and passwords for your students.
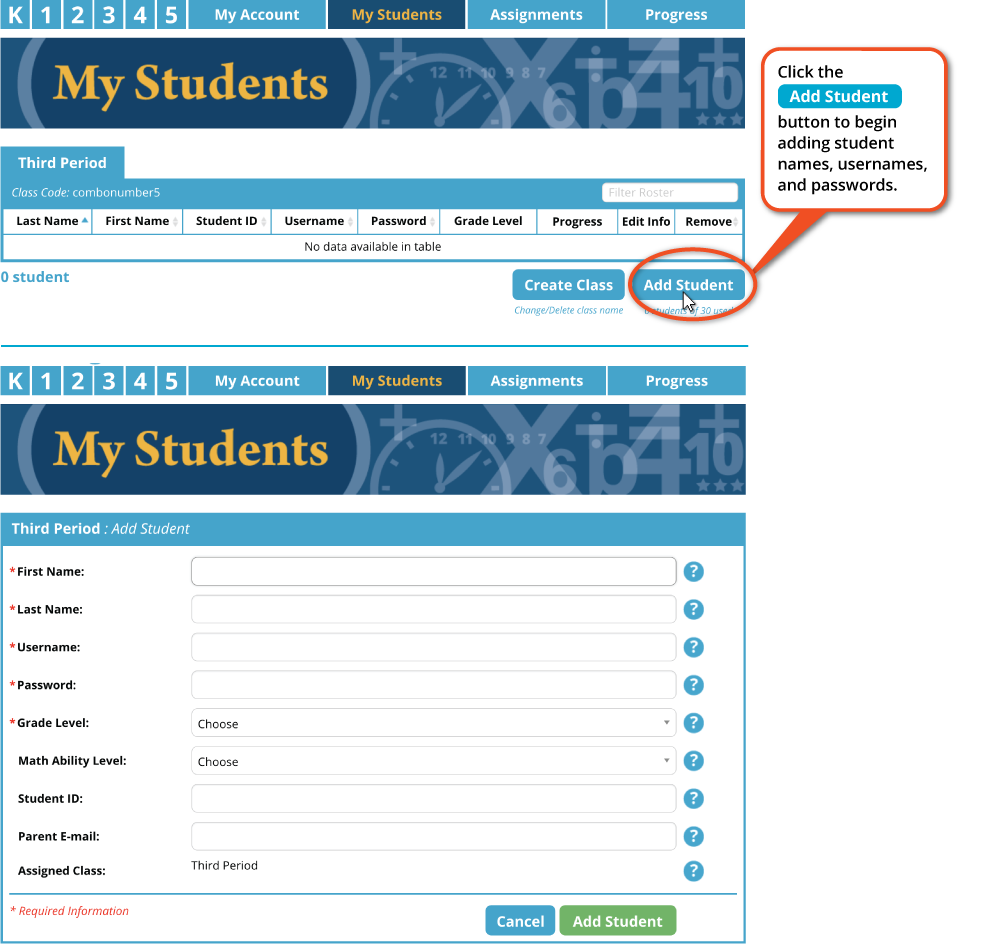
Step 5: Be sure your students know their username, password, and the class code. Have them log in and begin practicing math.
-
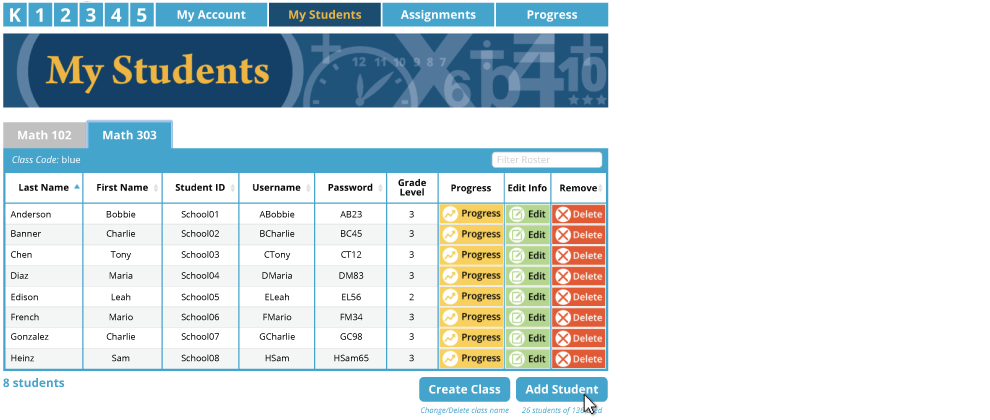
How do I add a student to my class roster?
Step 1: Click on "My Students" at the top of the page.

Step 2: Choose the class that you're going to add a student to. (If you only have one class, you can skip this step.)
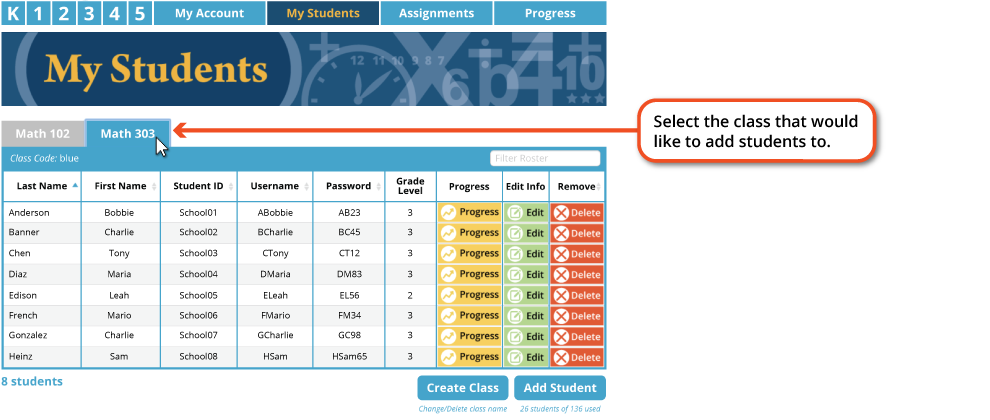
Step 3: Select "Add Student" at the bottom of your class roster.
-
How do I add a child to my account?
Step 1: Click on "My Children" at top of the page.

Step 2: Click the "Add Child" button on the lower right. Then fill out your child's information.

-
Can I change a students' name, username, or password?
Yes. Simply find the student's name in your class roster. Click "Edit" and change any information you need.
-
Can I view student usernames and passwords?
Yes. Select "My Students" at the top of the screen. You will see your class roster with each students' information listed.
Below your class roster, you will see several choices, including:
- Printable PDF with Student Passwords
- E-mail all Student Passwords to Myself
- Printable Letter to Parents (with Login Info)
- Download Roster as an Excel File
- Print Roster Table

-
What is "Math Ability Level"?
This is an optional field. If you enter a students' ability level, they may be given the option to view and explore lessons that are at their level.
For example, if you have a 4th grade student who is learning math at a 2nd grade level, you can choose a Grade 2 ability level. When the student logs in, he will see his assignments from the teacher, followed by 2nd grade topics/lessons to explore.
Note: When students are logged in, they will not see the grade level displayed as "1st Grade," "2nd Grade," "3rd Grade," etc. They will see "Level A," "Level B," "Level C," etc.
If you do not choose an ability level, students will see lessons at their regular grade level. For example, a 3rd grader will see 3rd grade (Level C) lessons.
-
Why can't I add another student to my roster?
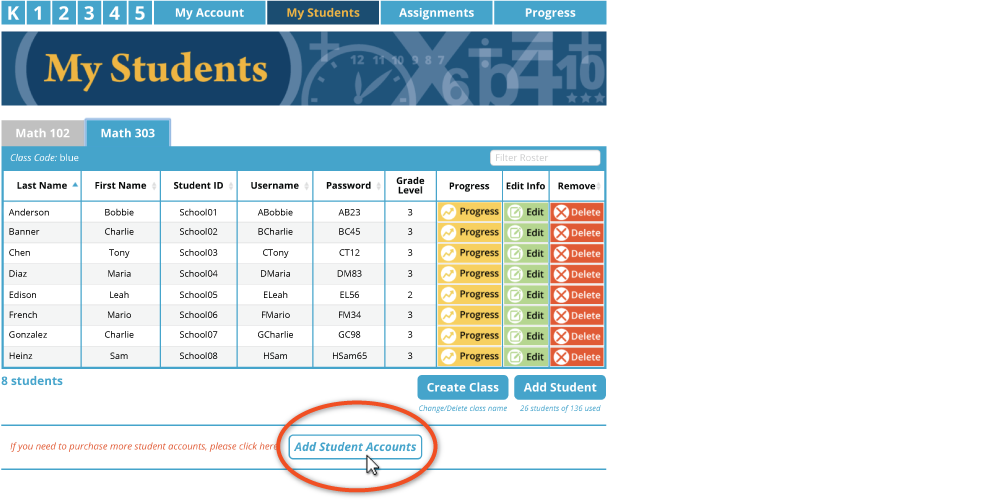
Your membership allows you to add only a certain number of students. If you exceed that limit, you'll have to extend your membership to include more.
If you have a student that is no longer in your class, you can delete a student and that will also free up an extra user.
Extend your membership to add an extra student:
Step1: Click on "My Students" at the top of the page.

Step 2: Select the at the bottom.
Please contact us if you have questions about this.
-
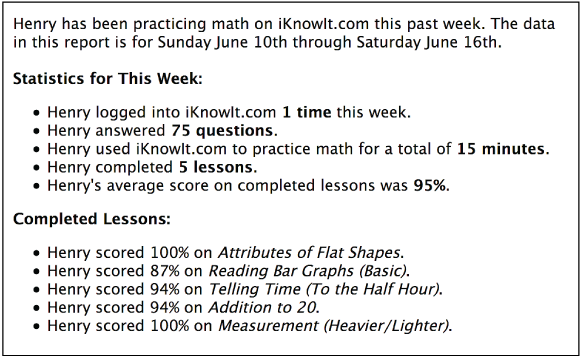
What will the progress report show?
Parents will receive an e-mail that shows which lessons their child has completed, and their scores.
- Will parent e-mails be shared with other businesses or third parties?
-
How do I set this up?
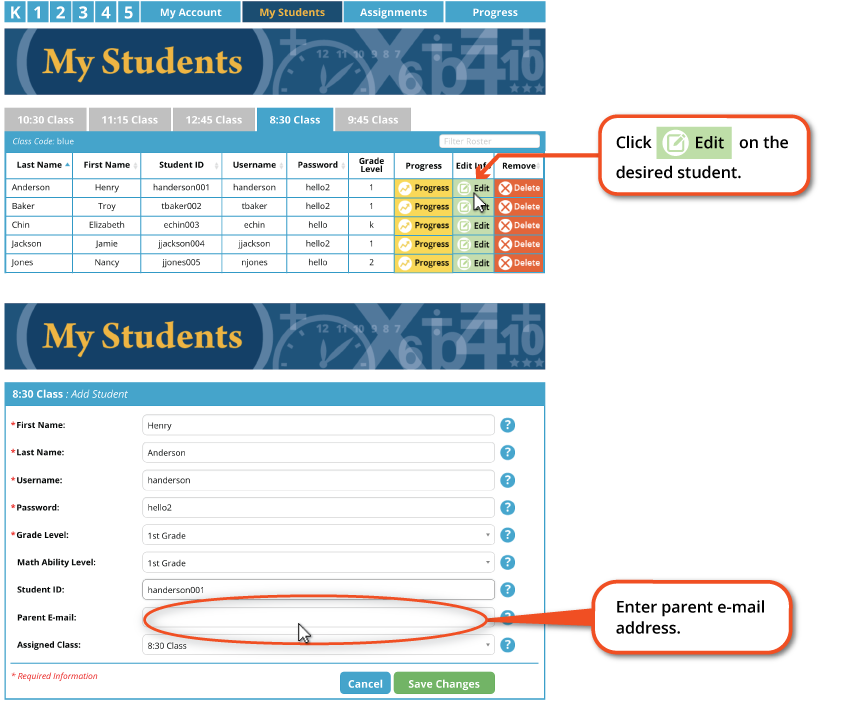
Make sure that each student has a parent e-mail address entered with their roster information.
If you've already set up your class roster, you'd simply go to your roster and click on the
 button on the desired student. You'll then see a field for parent e-mail.
To ensure the e-mail scores are sent to the parents switch to the "On" option in your account settings.
To do this, click on "My Account" and look under "General Lesson Settings."

-
When are parent progress report e-mails sent out?
Parent progress report e-mails are typically sent out after the week has ended. We usually send these e-mails out on Saturday morning. They include data for the previous week.
-
What if the student has not used IKnowIt in the past week?
When a student has not used IKnowIt during the week, his/her parent does not receive an e-mail.
-
Can I turn this feature off?
Yes, you can turn off the weekly parent progress reports at any time. Simply go to your account settings and switch the "E-mail scores to parents" setting to off.

-
Can parents opt-out if they choose?
Yes, parents can opt-out of receiving these e-mails, if they desire. They'll simply click the "unsubscribe" link at the bottom of the e-mail.
-
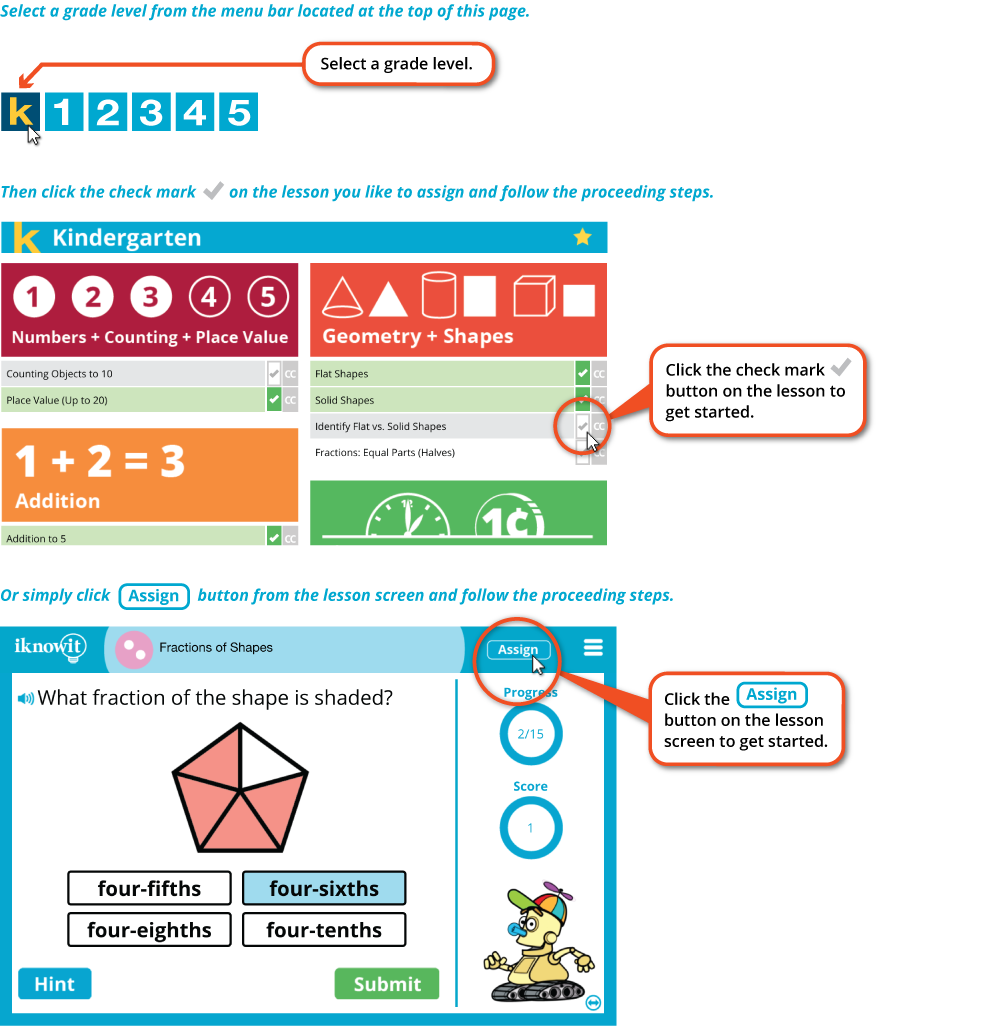
How do I assign a lesson?
Before you assign a lesson, you'll need to create a class roster. (For more information, please see: Setting Up Your Class Roster.)
Once you have your class set up, select K, 1, 2, 3, 4, or 5 at the top of the screen to see lessons at a specific grade level. When you arrive at the menu list for that grade level, click on the checkmark () next to the lesson name to assign it to your students.
-
How do I re-assign a lesson?
After a student has finished a lesson, you can reassign the lesson.
Step 1: Log in with your teacher account and choose "My Assignments"
Step 2: Find the assignment name and choose "More info."
Step 3: Find the student's name and select "Reassign."
-
Can students resume a partially completed assignment?
If a student is not able to finish an assignment in one sitting, I Know It saves their progress.
The next time the student logs in to I Know It or visits their homepage, the assignment will be displayed. Clicking or tapping on the lesson will bring the student to the exact point where they left off.
-
How do I turn off the animated character?
There's a button in the lower-right, located just below the character. If you click it, you'll toggle between these three choices:
- Animated character
- Emojis
- Off
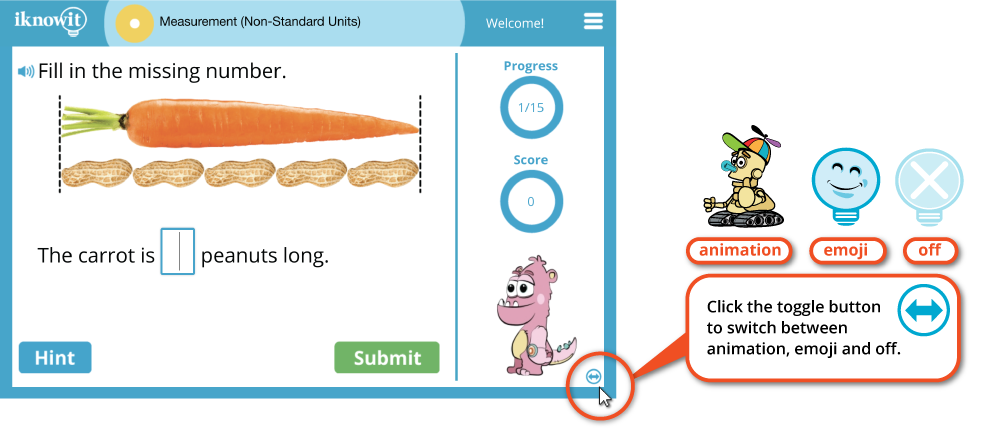
If you do not want any of your students to be able to turn animations on, you can turn them off in your lesson settings. To do this, go to the "My Account" tab at the top of the page. Then scroll down to the "General Lesson Settings" subheader. You'll see an option to "turn off animations."
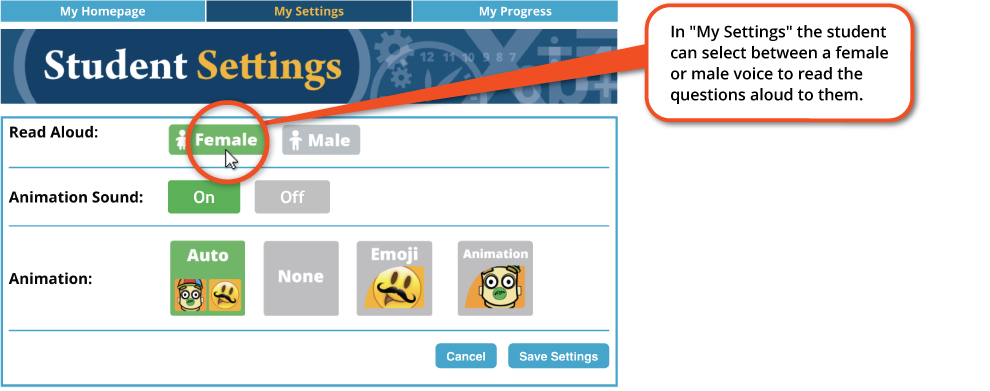
Students who are logged in can also adjust animations by clicking "My Settings."
-
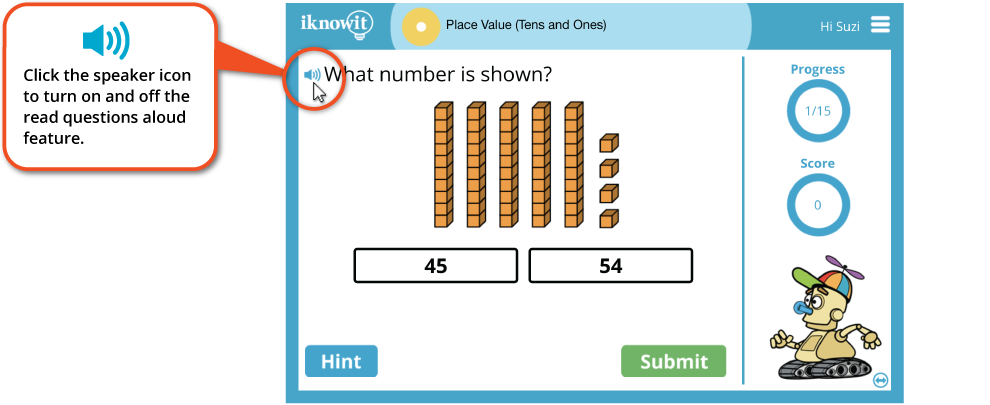
Can questions be read aloud?
Yes. Simply click on the speaker icon next to a question or math problem.
Students can change the voice in their settings. To do this, simply click on "My Settings" and choose between male or female voice.
If you want to disable the read aloud feature for your students, simply go to the "My Account" tab at the top of the page. Then scroll down to the "General Lesson Settings" subheader. You'll see an option to disable read alouds.
-
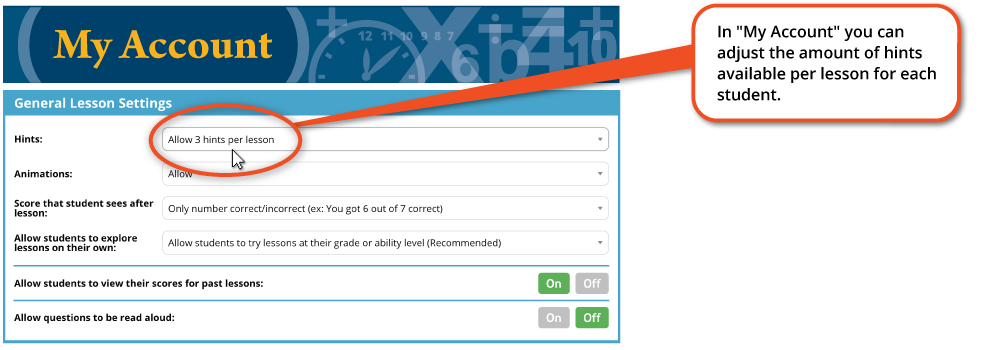
Can I turn off hints? Can I allow them on all questions?
Yes. Go to the “My Account” tab at the top of the page. Then scroll down to the “General Lesson Settings” subheader. You can choose between:
- Allow 3 hints per lesson
- Always allow hints
- Never allow hints
Our recommended default setting is, "Allow 3 hints per lesson."
-
How can I view student scores and progress?
Go to the "Progress" tab at the top of the page. Choose your preferred progress report. Choose from:
- Recent Activity (See most recent lessons that your students have been working on.)
- Completed Assignments (See the results of lessons you've assigned.)
- Student Progress (Choose a student to see what they've been working on.)
-
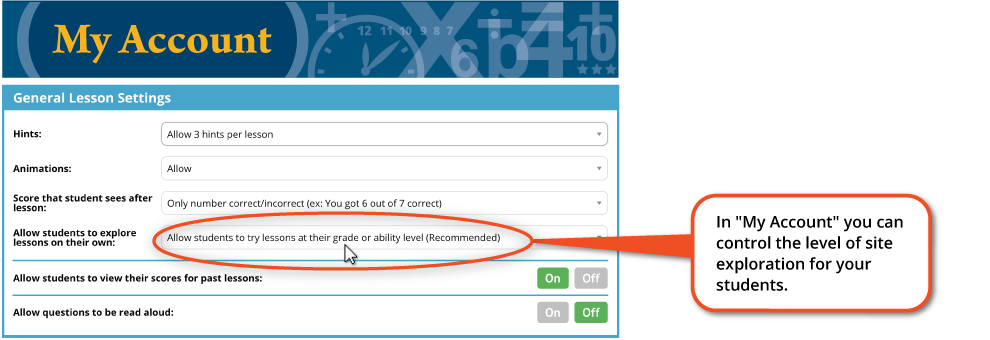
Can I control what lessons students can see?
Yes. Go to the "My Account" tab at the top of the page. Then scroll down to the "General Lesson Settings" subheader. You can allow students to try lessons...
- Only at their own grade or ability level
- Only at their grade level
- Only at their ability level
- At any level
- Only allow assigned lessons
We recommend letting students explore the site by allowing lessons at their grade or ability level.
We do not recommend only allowing assigned lessons. This will prevent students from exploring the site on their own to review important math skills.
-
Can student scores be emailed to parents?
Yes they can, but only if the teacher or administrator allows it.
To send a weekly progress report by email to parents, visit the "My Students" page. Click the edit button for any of your students, input their parent's email address, and click the green "Save Changes" button. Make sure that you have the "E-mail scores to parents" option set to On under your My Account settings.
To turn this feature off, go to the "My Account" tab at the top of the page. Then scroll down to the "General Lesson Settings" subheader. Set the "E-mail scores to parents" option to No.
Note: Weekly update e-mails will only be sent to parents if you have entered parent e-mail addresses in your class roster.
-
How do I change my State Standards?
Select a grade level from the menu bar located at the top of this page.

To the right of each lesson title is a CC icon. Click it to see the standard(s) that corelate.

In the account setting page, you can toggle between Common Core, Florida Standards, and Texas Standards.

-
Are you adding new lessons/topics to this site?
Yes! We have a small staff of teachers, writers, and graphic artists who are expanding the site every day. Feel free to let us know if there's a specific topic you'd like to see covered.
-
Is there a free trial?
Yes. We offer a free, 30-day trial to interested schools, teachers, and parents.
With the free trial, you will receive unlimited access to all math lessons on this site. You will also be able to create student accounts, and track student progress.
When the free 30-day trial is up, you will be able to renew or let the trial subscription lapse.
No credit card is required and we do not have an auto-renew system.
To request a free trial, please go to our free trial page.
-
After my subscription is up, will I receive a bill?
No. We will not bill you or automatically renew your account when your subscription is up.
You will receive an e-mail reminder. If you'd like to subscribe for a membership, you can click the link and enter your billing information to extend your subscription.
-
How much does a subscription cost? How do I sign up?
Please see our pricing page for current membership options and prices.
To sign up, please visit our sign up page.
-
What payment methods do you accept?
You can sign up online with a credit card. We can also accept school purchase orders or checks via snail mail.
-
When I sign up for free, will I receive e-mails?
We never share personal information with other companies or organizations.
We may send you an occasional I Know It newsletter and/or information about I Know It updates. You may also receive student progress updates. You can unsubscribe from these emails in your user settings.
-
How do I contact you?
You can contact us by e-mail, mail, phone, fax, or homing pigeon.
Send us a message through our online form: Online Form
E-mail: helpdesk@iknowit.com
Address: 6 Main Street, Tonawanda, NY 14150
Phone: 716-264-6000 (Billing and Account Inquiries Only. Our phone support staff is not trained to help with technical computer issues.)
Fax: 716-260-2516


